Are you ready to spice up your meal prep? These savory healthy baked chickpea patties are packed with flavor and nutrition. Perfect for busy weeks, they offer a delicious way to enjoy plant-based goodness. I’ll guide you through simple steps to create these patties, with tips on flavor, texture, and storage. Let’s dive into this easy recipe that your taste buds will thank you for!
Why I Love This Recipe
- Healthy Ingredients: This recipe uses wholesome ingredients like chickpeas and oats, making it a nutritious option for any meal.
- Easy to Prepare: With minimal prep time and simple instructions, these patties can be whipped up quickly, perfect for busy weeknights.
- Versatile Serving Options: These patties can be enjoyed on their own, in a salad, or as a filling in wraps, offering great versatility.
- Flavorful Spices: The combination of cumin, smoked paprika, and fresh herbs adds a delicious depth of flavor that everyone will love.
Ingredients
Detailed Ingredients List
To make these savory chickpea patties, gather the following items:
- 1 can (15 oz) chickpeas, drained and rinsed
- 1/2 cup rolled oats
- 1/4 cup finely chopped red onion
- 1/4 cup grated carrot
- 2 cloves garlic, minced
- 1 tablespoon olive oil
- 1 teaspoon ground cumin
- 1 teaspoon smoked paprika
- 1 teaspoon salt
- 1/2 teaspoon black pepper
- 1/4 teaspoon cayenne pepper (optional for heat)
- 2 tablespoons fresh parsley, chopped
- 1 tablespoon lemon juice
Nutritional Information per Serving
Each serving contains:
- Calories: 180
- Protein: 7g
- Carbohydrates: 25g
- Dietary Fiber: 6g
- Total Fat: 6g
- Saturated Fat: 1g
These patties offer a healthy mix of protein and fiber, making them a great choice for a meal.
Substitutions and Allergen Considerations
You can replace chickpeas with black beans for a different taste. If you need it gluten-free, use certified gluten-free oats. For onion allergies, try using chives or shallots. To avoid nuts, ensure your spices are nut-free. Always check labels for allergens.
Step-by-Step Instructions
Preparation Overview
Start by gathering all your ingredients. You need one can of chickpeas, rolled oats, red onion, carrot, garlic, olive oil, spices, parsley, and lemon juice. Preheat your oven to 375°F (190°C) and line a baking sheet with parchment paper. This step keeps the patties from sticking.
Blending the Patties Mixture
In a food processor, combine these ingredients:
- 1 can chickpeas
- 1/2 cup rolled oats
- 1/4 cup finely chopped red onion
- 1/4 cup grated carrot
- 2 cloves minced garlic
- 1 tablespoon olive oil
- 1 teaspoon ground cumin
- 1 teaspoon smoked paprika
- 1 teaspoon salt
- 1/2 teaspoon black pepper
- 1/4 teaspoon cayenne pepper (optional)
Blend until mixed well but still chunky. This texture gives the patties a great bite. Transfer the mixture to a bowl. Stir in 2 tablespoons of chopped parsley and 1 tablespoon of lemon juice. Make sure everything is mixed evenly for great flavor in every bite.
Baking and Flipping Tips
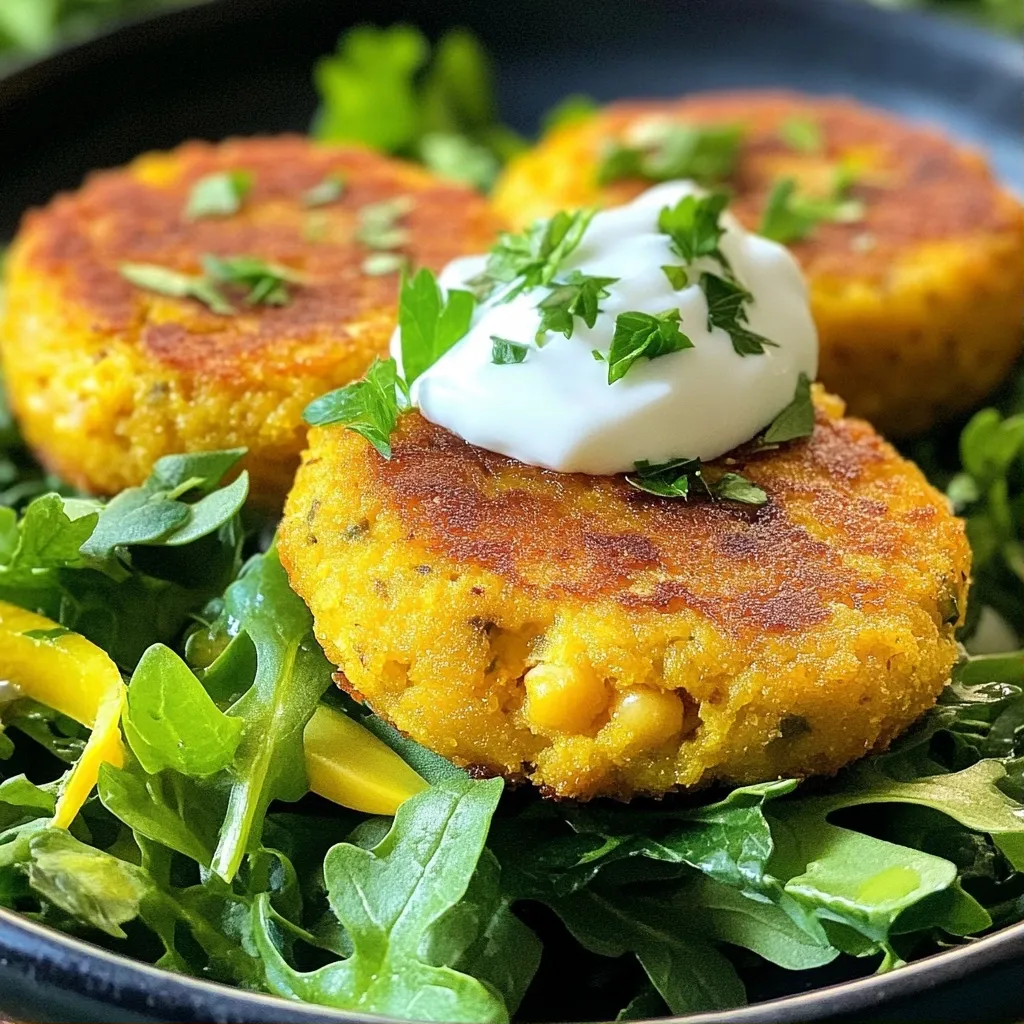
Form the mixture into patties, about 2-3 inches wide, and place them on the lined baking sheet. Bake for 25-30 minutes. Flip the patties halfway through baking. This ensures they cook evenly and get crisp on both sides. When golden brown and firm, they are done. Let them cool for a few minutes before serving. Enjoy these tasty and healthy baked chickpea patties!
Tips & Tricks
How to Achieve the Perfect Texture
To get the best texture in your baked chickpea patties, you need to blend carefully. Use a food processor to mix the chickpeas, oats, and veggies. Aim for a mixture that is well combined but still a bit chunky. This helps the patties hold together while keeping some bite. If the mix feels too wet, add a bit more oats. If it’s too dry, add a splash of water or olive oil.
Making Ahead for Meal Prep
These baked chickpea patties are perfect for meal prep. You can make them ahead and store them in the fridge. After cooking, let the patties cool completely. Then, place them in an airtight container. They will last for about four days. You can also freeze them for up to three months. Just bake them first, then freeze. When you want to eat them, reheat in the oven or microwave.
Serving Suggestions and Pairing Ideas
For serving, you can get creative! Place the patties on a bed of mixed greens. Top them with yogurt or tahini sauce for added taste. Fresh herbs like parsley or cilantro make a great garnish. You can also serve them with a side of roasted veggies or a zesty salad. Pair them with whole grain pita or a wrap for a healthy meal. Enjoy experimenting with different sides!
Pro Tips
- Chickpea Consistency: Ensure the chickpeas are well-drained and rinsed to avoid excess moisture, which can make the patties too soggy.
- Forming Patties: Wet your hands slightly while forming the patties to prevent the mixture from sticking to your fingers.
- Flavor Boost: Experiment with additional spices like coriander or turmeric for a unique flavor twist.
- Storage Tips: Cool the patties completely before storing them in an airtight container; they can be refrigerated for up to 3 days or frozen for longer shelf life.
Variations
Flavor Enhancements (Spices and Herbs)
You can boost the taste of your patties with spices and herbs. Try adding cumin, smoked paprika, or even curry powder for a unique twist. Fresh herbs like cilantro or basil can also add freshness. Experiment with a pinch of chili powder for some heat or dried oregano for an earthy flavor. Each spice can change the whole dish.
Adding Extra Vegetables
Adding more veggies can make your patties even better. Finely chopped bell peppers, zucchini, or spinach mix well. These veggies add color, flavor, and nutrients. You can also use sweet corn or peas for a sweet crunch. Just remember to chop them small so they blend well.
Alternative Protein Options
Want to switch it up? Use black beans or lentils instead of chickpeas. Both options provide nice texture and flavor. You can even mix chickpeas with other beans for a protein boost. This keeps the patties healthy and fun. Each choice adds a different taste, so feel free to explore.
Storage Info
Storing Leftover Patties
After making your savory baked chickpea patties, let them cool completely. This step helps keep the texture nice. Place the leftover patties in an airtight container. They can stay fresh in the fridge for up to 4 days. To keep them from getting soggy, separate layers with parchment paper.
Freezing Instructions
If you want to save some for later, freezing works great! Start by letting the patties cool down. Next, place them on a baking sheet in a single layer. Freeze them for about an hour. Once they are firm, put them in a freezer-safe bag. Remove as much air as possible. They can last up to 3 months in the freezer.
Reheating Tips
To reheat, use the oven for the best results. Preheat your oven to 350°F (175°C). Place the patties on a baking sheet and heat for about 10-15 minutes. This keeps them crispy. You can also use a microwave, but they may lose some crispness. Heat them in short bursts of 30 seconds, checking often. Enjoy your tasty meal!
FAQs
How to Make the Patties Vegan?
These patties are already vegan! They use chickpeas, oats, and veggies. If you want to make them more exciting, add spices or fresh herbs. You can also swap olive oil with another plant-based oil. This keeps the flavor rich and healthy.
Can I Use Dried Chickpeas Instead of Canned?
Yes, you can use dried chickpeas! Soak them overnight and cook until soft. This usually takes about an hour. Once cooked, drain and rinse them before using in the recipe. Using dried chickpeas may give a fresher taste.
What to Serve with Baked Chickpea Patties?
These patties are great with many sides. You can serve them on a bed of mixed greens. Add a dollop of yogurt or tahini sauce for creaminess. Fresh herbs like parsley or cilantro add color and flavor. You can also pair them with whole grains like quinoa or brown rice for a full meal.
This article covered all you need to know about baked chickpea patties. We explored key ingredients, step-by-step making, and helpful tips for success. You learned how to customize your patties and store them for later use. With this knowledge, you can create tasty meals that fit your needs. Enjoy showing off your new skills. Your kitchen adventures are only starting! Keep experimenting with flavors and enjoy each bite.